
How to Install Low Voltage Cable
Low voltage cabling can be for powering a gate motor, connecting a 12V to 24V gate motor to a separate control box, for intercoms, digital keypads or any other such devices. The normal rules are any voltage less than 32VAC or 50VDC can be installed by anyone, you don't need to be a registered electrician.
What Type of Cable to use Outdoors
For devices such as Intercoms, Digital Keypads and Press Buttons telephone or data cable that is rated for in the ground is best. This has a tough polythene outer sheath and filled with gel to stop moisture penetration because moisture in the ground can corrode the copper wire very quickly if not protected particularly if it has DC voltage on it permanently as you do with devices like this. For Low voltage power, 2-wire Intercoms, Electric Locks and motor cables low voltage garden lighting cable is ideal as this has a thick polythene sheath and the copper strands are thick enough not to dissolve away in the ground.
Running the cable across a Concrete Driveway or Path
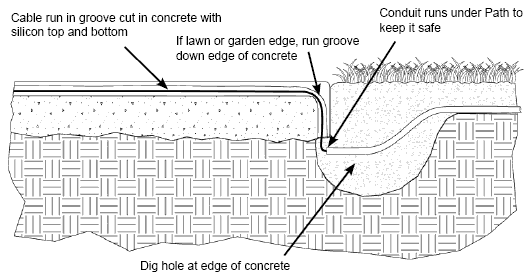
If there is lawn or garden leading up to the edge of the concrete dig a hole and using a large angle grinder with a diamond concrete cutting blade to cut a groove across the driveway and down the side so the cable comes out below ground preferable from under the concrete. This way the cable won't be damaged when someone is mowing the lawns, trimming the edges or weeding. You can put a bit of concrete on top of the cable where it comes away form the driveway as an extra protective measure.
Don't have the cable going around a bend too tightly because this can cause it to get hot at the bend and even melt. Always give the cable a gentle curve.
The cable can be held in place with non acidic plumbers silicon or mastic. If you brush some of the dust from cutting the concrete onto the wet silicon it will look like grout.
Never run Low Voltage cable in the same conduit as 240V mains voltage, always run it in separate conduit and keep them at least 200mm away from each other because mains voltage can cause interference on some Low Voltage Equipment and once you have the cable in it is a big job to fix this if it happens.
If your groove comes up against a wall or post
You can use a masonry drill to carefully bring the groove up to a post, wall or even into a corner. The concrete cutter can be used to open a gap at the edge of concrete that comes up against a wall and the drill for the corners because it is a lot more fiddly.
Pointers for Installing Low Voltage cabling:
- Always run your cabling in conduit if it goes across lawn, open dirt and gardens.
- Conduit should be buried deep enough so it is out of harms way. Normally 150mm is fine although feel free to go deeper if there is any likely hood it will be dug up.
- Always use cable that is rated for use in the ground if it is going in the ground. For security applications telephone cable or CAT5 cable rated for in ground use is fine. This cable has a tough polythene sheath to protect it from damage and is filled with a water proofing gel to protect it from moisture in the ground. For Automatic Gate Motors, Low Voltage Power for Automatic Gate operators or Garden Lighting use Low Voltage Garden Lighting cable or solar cable as this is fairly heavy duty and has a tough polythene sheath.
- Never join cable in the ground unless you use gel filled connectors and protect it with heat shrinkable tubing rated for in the ground or other such product. If you need to you can install an electrical pit and use gel filled connectors making sure the joint is in open air inside the pit and that it doesn't become submersed in water. The best solution is to bring the cable above ground and join it in a weather proof junction box.
Running Low Voltage Cable Across Pavers
You can either run a groove in the gap between the pavers or pull up a row of pavers and run the cable in conduit under them and then refit them. If the pavers are glued to concrete you can remove them carefully with a bolster chisel, cut a groove in the concrete then glue the pavers back on again, although its best to have spares when doing this in case you break some.
Chasing cabling up Concrete or Brick Walls
For concrete block walls you can chase a groove up the wall and through a hole if need be then silicon the wire in the groove holding it in place by wedging something in the groove. Then afterwards this can be patched with mortor mix or render and painted to match it up the best your can. For brick you can clean the mortor out between the bricks with a concrete cutter and masonry drill then slip the cable in the gap and fill it back up with some fresh mortor.
Using a Fence to Run the Low Voltage Cable
If you have a timber fence in good condition you can just tack the cable under fence rails etc... neatly, which can be a lot easier than digging a trench. You can also run it up behind down pipes, under weather boards, under deck or where ever it can be tack in place out of harms way and out of sight.
Running Cabling inside Hollow Steel Posts
If you drill a 20mm diameter hole in the top and bottom of a hollow steel post then tape a large nail or something similar to the end of some speaker wire you can drop the nail down the post from the top hole then using wire from a wire coat hanger or similar with a hook bent into the end you should be able to hook the nail from the bottom hole and pull it through. This will give you a draw wire in the post that you can use to pull other wire through. The speaker wire is good because it is quite flexible so will allow the nail or similar weight to pull it down without jamming on the side.