
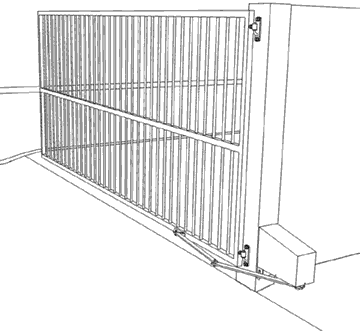
Articulated Arm Motors are also known as Bent Arm, Knuckle Arm or Folding Arm Motors.
How Articulated Arm Swing Gate Motors work
The motor consists of a box with a built in electric geared motor and electronic controls that fits onto a gate post and has an articulated arm connecting to the gate. When activated the articulated arm turns slowly pulling the gate open or pushes it closed.
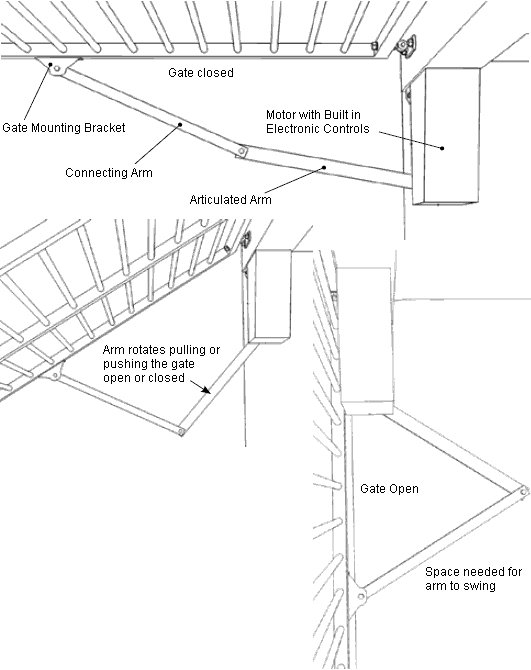
Articulated arm motors usually have a built in limit switches to set the open and close position of the gate with out the need for hard stops. The arm holds the gate in the closed position quite effectively eliminating the need for an electric lock in most cases.
Double Swing Gates require a two motors, one for each side. Only one motor contains control electronics, which controls both motors keeping them synchronised. The second motor requires a cable across the driveway. Normally only a two core cable is necessary as the limits switches cut power to the motor directly but some motors do require extra cable for the limit switches so it's a good idea to include five core cable anyway or a heavy duty 2 core and a lighter duty four core just in case.
Position Motor on Post
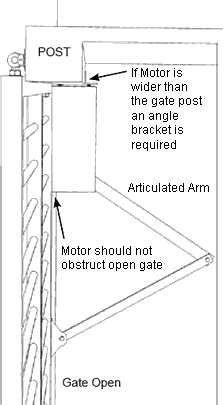
If Motor is wider than the gate post then an angle bracket is required.
There must be enough space for the articulated arm to swing (normally 600mm - 24") when the gate is open. Some motors have a special channel arm that take up much less space when the gate is open.
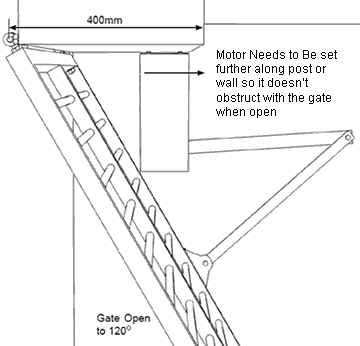
If the Gate Post is angled then the motor must be fitted further along the post so it doesn't obstruct the gate when open. If there is no space on the post a new post must be installed or mounting bracket made up.

If the gate is to open more than 90o then the motor must be fitted further along the post or wall too so it doesn't obstruct with the gate when open. Maximum opening angle is 120o. If the post isn't wide enough one must be installed or mounting bracket made up.
Outward Opening Gates are possible with Articulated Arm Motors too by swapping the wires of the motor around so it runs in the reverse direction and swapping the limit switch wires around too if limit switches are used.
Height of the Motor on the Post
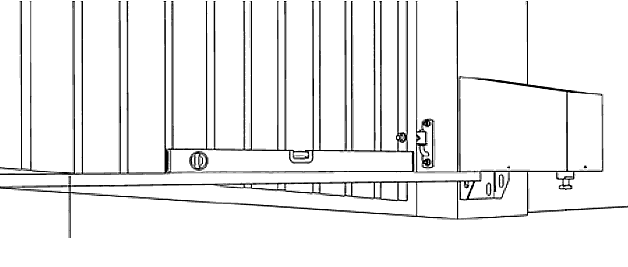
The motor may connect to the bottom or middle rail of the gate. Normally the bottom of the motor must line up with the top of the gate rail.
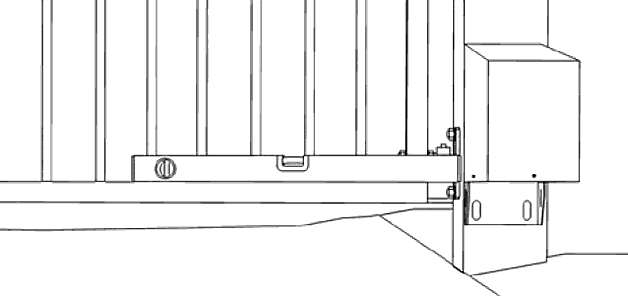
If the bottom rail is raked place the motor against the post with the articulated arm set to the closed position (arm nearly straight) to find the point where the gate mounting bracket will fit onto the gate.
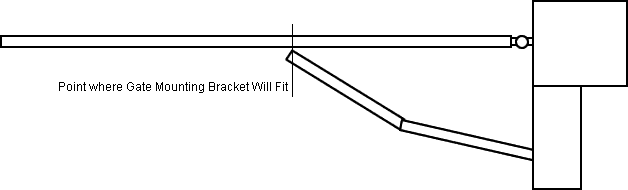
Then using a level and a straight edge from the top of the rail at this point you can find the height of the motor on the post.
Fitting Motor to Post
Next fit the motor to the post. If its a steel or timber post you should bolt through the post with M8 cup head bolts so it doesn't pull off. You can also drill and tap M12 galvanised bolts into a steel post or use large coach screws for hardwood posts.
For Brick or Concrete block posts they must be core filled with concrete and use dyna bolts large enough to fix to the concrete core (normally 16mm (10/16) dia. x 147mm (6") long dyna bolts) other wise it may pull off if someone pushes hard on the gate.
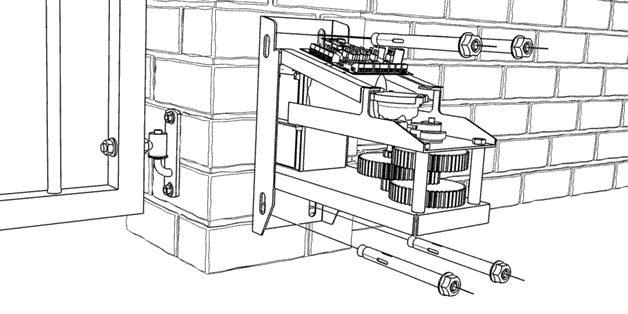
You are now ready to terminate any cabling for low voltage power or controls. You must be a registered electrician to connect mains voltage power or install a power point.
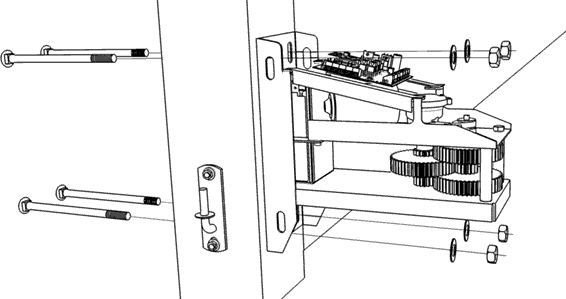
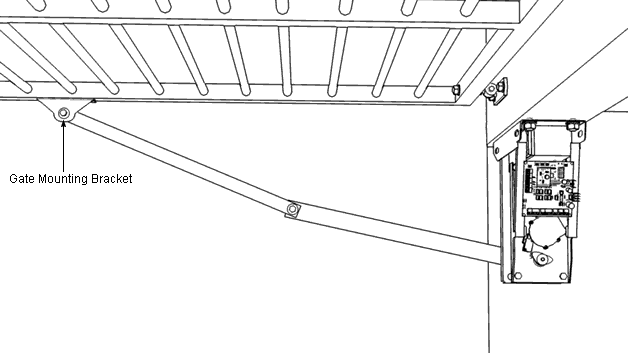
Gate Mounting Bracket
Before fitting the Gate Mounting Bracket you must firstly fit the Motor to the Post.
Next you need to position the Articulated arm so it is in the closed position, which is normally with the arm almost straight.
Normally the control electronics are built into the motor and can be used to position the motor although some motors you can do this with manual release. If you can't do this with the manual release and the control box is separate you can touch the motors wires across the backup battery if it has one or else you will need to install the control box first before doing this.
For motors with limits switches you may need to disable these temporarily or set their limits way beyond what is needed temporarily.

Bolt the Gate Mounting Bracket through the gate with Cup Head Bolts because they look nicer from the front and will hold a lot better than Tek screws.
If you prefer not to see anything from the front you can use Nutserts that work a bit like a rivet but have a threaded hold in the middle so you can screw a bolt in that. These work well but you do need a special crimping tool to use them, which is expensive so unless you're doing this all the time its more economic to bolt through with cup head bolts.
Getting it all Working
If the motor has a separate control box and you haven't installed this already then do so. Do not connect any photocells, digital keypads, intercoms etc... yet get the gate working without these first to reduce confusion if something's not working correctly ...
READ MORE about how to install a control box
Power up the motor then set the remote controls ...
READ MORE about how to set remote controls to work on your motor
Then set the open and close limits for the gate ...
READ MORE about how to set Open and Close Limit
Now connect accessories one at a time and test their operation such as Photocells, In Ground Vehicle Detector, Digital Keypad, Intercom etc...