How to install an Automatic Sliding Gate that uses Track
Want to install an automatic sliding driveway gate but don't know where to start? well this page shows how a typical sliding gate that runs on a track is installed.
Check out the following video that covers why install a sliding gate as opposed to a swing gate, why to install a sliding gate with a track rather than cantilevering it and how to install a sliding gate that runs on a track.
If you're in Australia and would like to buy hardware for sliding gates, motors or full gate check out these links:
When Installing an Automatic Gate that will be entered from a public road way, make sure the Gate is placed far enough from the road to prevent traffic congestion and is installed in a location that provides adequate clearance between it and adjacent structures when opening and closing to reduce risk of entrapment.
The Gate must comply with any applicable local council regulations.
Installing the Footing for a Sliding Gate allowing for a Motor
If you have a concrete driveway then the footing for your sliding gate is halfway there. If you have a bitumen or gravel driveway you will need to dig a channel across your driveway and install concrete ... READ MORE about Installing Footings for Sliding Gates
Installing Posts for Sliding Gates
Metal posts are best because they don't warp or twist with changes in weather conditions. Posts for sliding gates don't need to be as large as those for swing gates ... READ MORE about Posts for Automatic Gates
Installing the gate
Fit the wheels to the gate first using Tek screws. This makes it easier to move around without scratching it.
Lay the track down where the gate is to be installed but don't fix it in place yet.

If using guide rollers or guide bracket, block and rail use Clamps to clamp the bracket to the gate post or wall other wise you will need to install a guide post. Place the gate on the track and fit the guide rollers or block so you can test whether the gate opens and closes properly without rubbing on the track.

If the gate does rub on the track you can pack the wheels out a bit so the gate sits a little higher to stop this happening. You may need longer Tek screws to refit the wheels.

Check Clearances
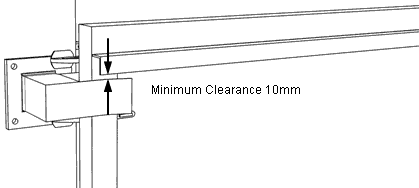
If using a 'U' shaped guide bracket check that the gate has at least 10mm (3/8") clearance between the top of the gate and guide bracket for the entire length of the gate. If there is slope across the driveway (camber) and the top rail is level then this would be at the highest point.

If there's slope across the driveway and the top rail is raked the guide block will need to be fitted at an angle so the guide rail doesn't grab in the block. If the gate is stiff to push in one direction but not the other then the angle isn't quite correct. If you use one Tek screw to start with then you can clamp the channel for the block at different angles until you find the angle that runs the smoothest.


Clamp the Keeper where you think it should be then close the gate and if using a guide rail make sure it clears the keeper by at least 10mm otherwise move it down.
You can now fit the Keeper and guide bracket permanently using suitable hardware. It is important that the guide bracket cannot come loose for safety reasons so the gate doesn't fall over and injure someone.
Install the Track
Now remove the gate so you can install the track permanently. Mark out and drill mounting holes in the track as follows:

Where you drive over the track on the driveway you should drill an 8mm (5/16") hole every 500mm (20") on both sides of the track. Where the track goes behind the fence you'll only need a hole every 500mm (20") on alternate sides as this doesn't need nearly as much strength.

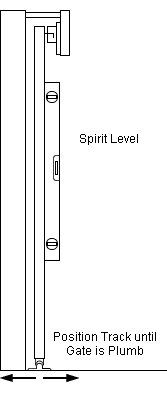
Before fixing the track in place put the gate back on the track again and check that the gate is plumb and that it lines up with the posts and keeper.
To fit the track use metal pin anchors, which are available at most nut and bolt suppliers as these are quick to fit, look nice and hold better than Dynabolts.
You need to drill holes in the concrete the correct size for the pin anchor, the 6.5mm (1/4") anchor is the most suitable requiring a 6.5mm (1/4") hole.
Pin the ends first and check the gate is lined up from fully closed to open, then install the remainder of the pin anchors.

The gate is now ready for installing a Motor .