
Setting Up IP Gate Intercoms, IP Outdoor Cameras and Associated Devices
IP stands for Internet Protocol, which is a data transmission system that an IP device uses to connect to the Internet. Analogue Intercoms and Cameras on the other hand are simply wired together, powered up and they will work, which makes them more straight forward to install but not necessarily any easier because installing cables can be quite a job on its own. IP Intercoms have the option of being wireless where necessary making cabling easier but they need to be setup, which is not as straight forward as their analogue cousins, and is the purpose of this page to introduce installers of Intercoms and Cameras to IP technology so they can master the setup of IP Intercoms, cameras and associated devices such as WiFi Access points. See Installing Intercoms for more details on how to install the necessary cabling, powering up the devices, what to do to make them wireless and how to integrate them with automatic gates.
Basic Networking Explained
IP devices such as Intercoms, Cameras and Associated devices are basically purpose built computers that can be connected to the Internet, well they are normally connected to a home network first along with other computers, game consoles, Smart TV's etc... that may be in the home and the home network is normally connected to the Internet. A home network is described as a local area network or LAN whereas the Internet is described as a wide area network or WAN. For one device to be able to find another on the same LAN, IP Addressing version 4 is used, which consists of four numbers between 0 and 255 separated by dots. A typical version 4 IP Address is 192.168.1.108 and with most LANs the first three of these numbers must be the same for each device and the last number different, so the last number (108) is the ID of the device or host as they are called and the first three numbers (192.168.1) are the ID of the subnet that the host is in. You can have more than one subnet on the same LAN say 192.168.0.??? for some hosts and 192.168.1.??? for others, although hosts from one subnet cannot talk to hosts on another, which is made this way so groups of hosts can be kept separate from each other even though they are on the same LAN.
Normally when you connect a computer, Smartphone or Tablet to a LAN you don't need to worry about IP Addresses or even know what they are because there is a device called a Router connect to the LAN that takes care of assigning IP Addresses automatically but these hosts normally have a screen and keyboard so people can interact with them but IP Intercom Outdoor Stations, IP Cameras and many other Hosts don't so to set them up you need to connect to them with a host that does, which means you need to know the IP Address of the host, if assigned automatically this isn't so easy so these hosts are given fixed IP Addresses so it is known. This is also called a static or manual IP Address. Automatic IP Addressing is called dynamic addressing. The protocol used for dynamic addressing is called Dynamic Host Configuration Protocol or DHCP so if you see that on any device you'll now know what it means.
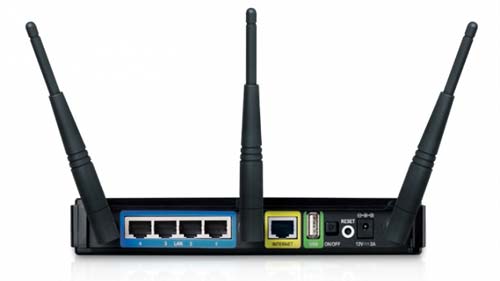
A router normally also includes a Gateway for connecting to the Internet (WAN), a switch for connecting to four different Hosts with a network cable and a WiFi Access point for connecting to many hosts with WiFi, so they manage a LAN, although a LAN could exist without a router by simply connecting a number of hosts to a switch with network cables that is like a 4-way splitter box for networks and could include a WiFi access point for connect hosts with WiFi, although without a Gateway there would be no internet connection and IP Addresses would all need to be set manually, which would be a bit of a pain so a router is an essential piece of the puzzle.
The reason we want the hosts to have Internet Access is so they will work with a Smartphone App from anywhere in the world there is mobile phone service.
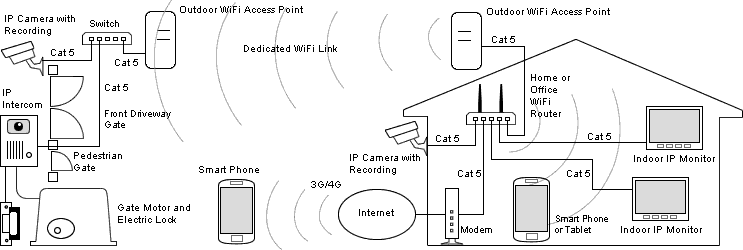
IP Devices used with an automatic gate including IP Intercom, IP Cameras, WiFi Access points for a long range WiFi link to the gate and a switch at the gate for connecting all devices at the gate to the WiFi Link.
Setting Up IP Devices
The reason for the explanation of basic networking is because when you first get an IP Device (host) the quick start guide that comes with it normally mentions a default IP Address that "needs to be on the same network segment". For installers not familiar with networking at all this may as well be written in ancient Hebrew and not understanding this means the difference between getting the device working or not, so its important to get an a basic understanding of networking. All IP devices (hosts) come out of the box with a default IP Address that may or may not work with the LAN to begin with, so may need to be changed. The thing is if the IP Address of the Host isn't in the same Subnet or another host has the same IP Address there is no way it will ever work and most of the time the IP Address does need changing, so an Installer Needs to Know how how to.
The first thing that needs to be checked is if the default IP Address of a Host will work on a LAN, if it does then its IP Address won't need to be changed. This can be done with a Smartphone, Tablet or computer connected to the LAN using a Web Browser such as Google Chrome, Mozilla Firefox, Apple Safari or if you must Microsoft Edge or Internet Explorer. It doesn't matter which browser, which device or how the device is connected to the LAN.
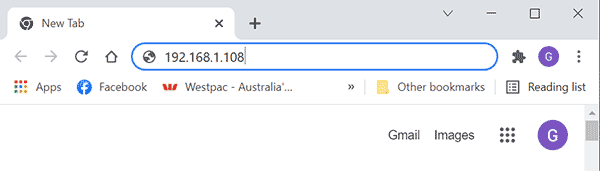
Enter the default IP Address of the device in the address bar at the top of the Web Browser and if you get what looks like a web page come up that has a login page or is wanting a password to be entered to initialise or activate the device then it is working already.
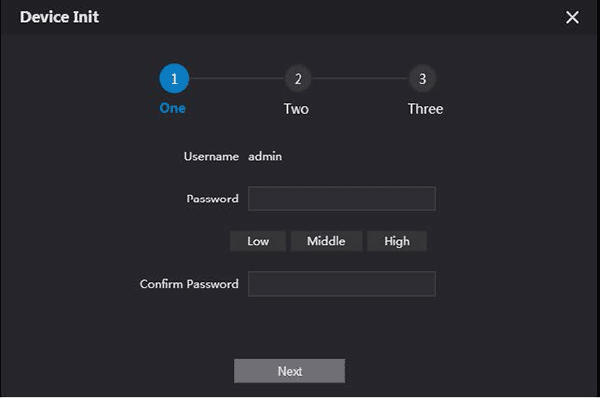
The page you will see will be something like the initialise screen for Dahua Outdoor Stations above and is actually on the device itself, which means you are connected to the device and are ready for the next step. If an IP Intercom comes as a Kit with an Outdoor Station and a Monitor these generally come with their IP Address set up ready to go so they can at least talk to each other and both devices IP Address can be changed if necessary from the Monitor so no computer or other device is needed.
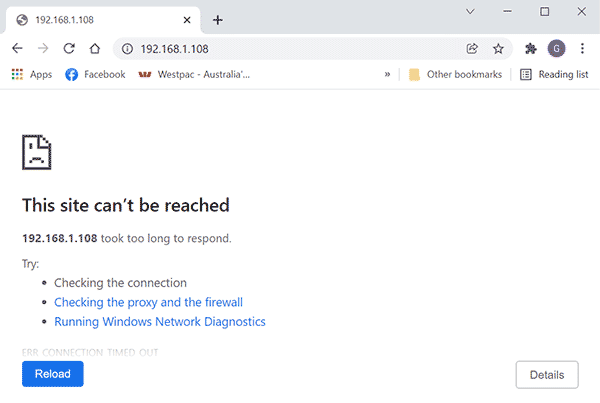
If you get a message like "This site cannot be reached" then the default IP Address will need to be changed.
If the default IP Address of an IP Device (Host) needs changing firstly you will need to know what subnet of the LAN is, the easiest way to find this is to use a Smartphone.
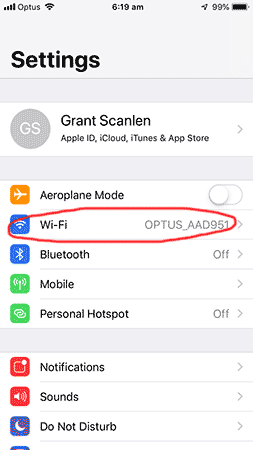
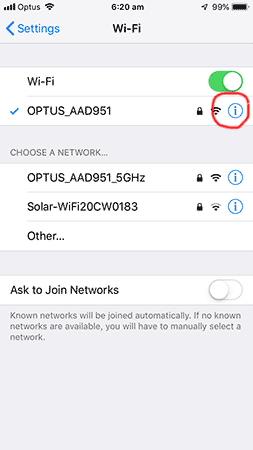
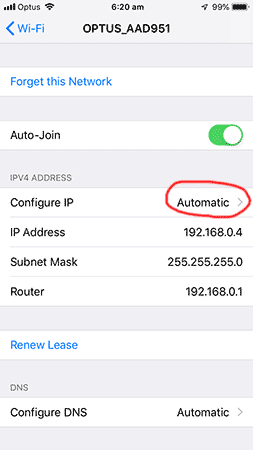
For iPhones tap settings, WiFi then the little "i" button next to the WiFi hotspot you are connected to. If you have an Android Smartphone you also go to settings, WiFi and tap on your hotspot.
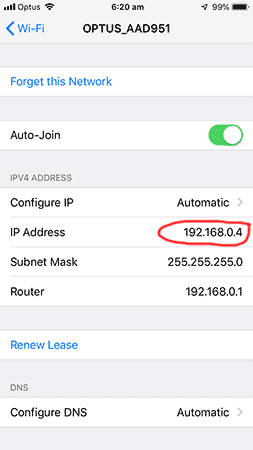
This will bring you to the IP Address of the phone. The first three numbers of the phones IP Address is the subnet we're are looking for. You will also need the IP Address of the Router/Gateway, which is on the same screen with an iPhone but we'll need to get later on with Android.
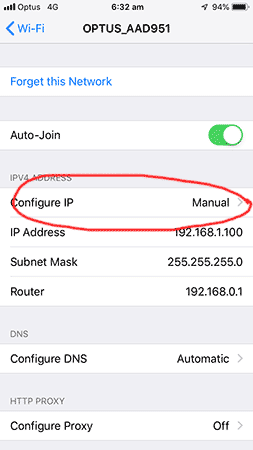
The IP Address of the host can also be changed with a Web Browser on the same Smartphone but before this can be done the Smartphones IP Address must be on the same subnet as the Host.
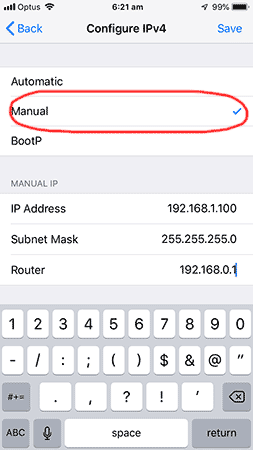
With an iPhone return to settings/WiFi as before and tap Automatic and then Manual. With Android instead of just tapping the hotspot you tap and hold it until a popup appears, select Modify network config, scroll down and select Advanced Options and tap DHCP then tap Static.
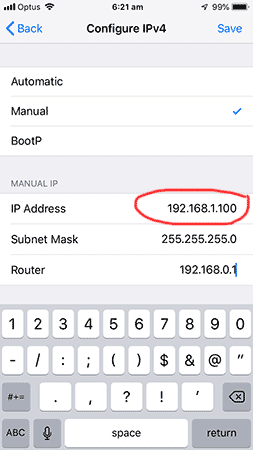
Here you can change the WiFi IP Address of the Smartphone, leave everything else as it is. This is when you can also take note of the Gateway, which we'll need later. Make the first three numbers the same as the Host but the last number different, tap save.
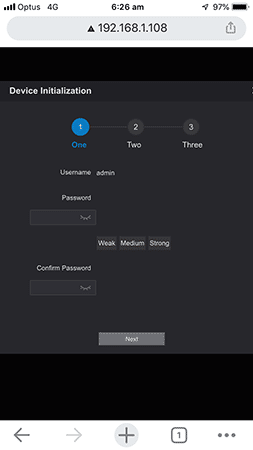
Now if you open up a Web Browser and enter the Hosts default IP Address in the address bar at the top you should get the initialisation/activation screen or a Login Screen. This is one the Host device itself, which means we have successfully connected to the Host. The screen in the image above is from Gen 2 Dahua IP Intercoms Outdoor Station.
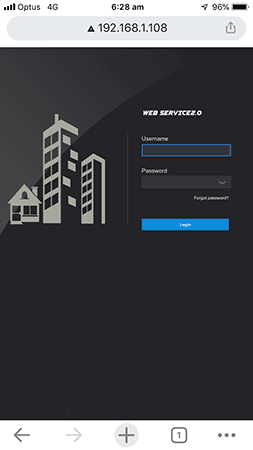
If you have an initialisation or activation screen you will need to assign it a password and if asked an email address to recover the password if forgotten then you will have a login screen appear. The user name is normally "admin" and the Password the one you just assigned.
If you only got a login to begin with then there will be a default password assigned already, which is normally also "admin" and you will need to enter this.
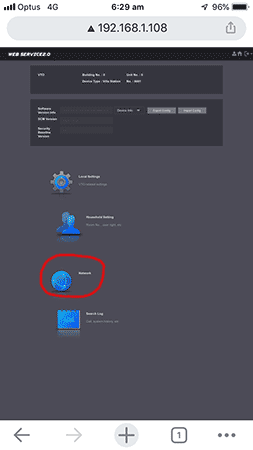
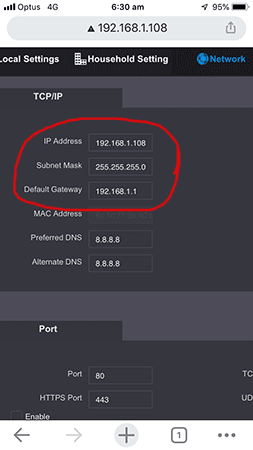
Once in you need to select the Network menu where the IP Address of the Host can be changed. You will also need to change the Default Gateway so the Host has Internet access and once in use can connect to a Smartphone out of WiFi range. The IP Address of the default gateway is the Router we collected earlier from the iPhone or Gateway from Android.
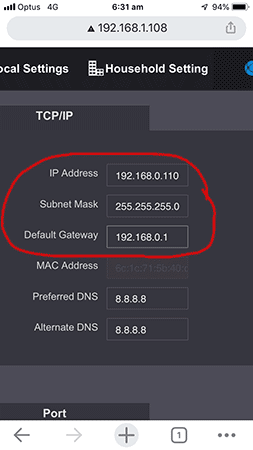
The IP Address of the Host must not be the same as any other Hosts. Most Hosts such as computers, Smartphones, game consoles etc... have their IP Address assigned by the router automatically that generally starts from the lowest number first and works its way up from there, so the router is normally 1, the first host such as a computer 2 and other hosts 3, 4 etc... so if you have less than 100 hosts on your LAN then it's safe to use Host numbers from 100 up, so long as there are no other Hosts with manually set IP Address on the LAN. We used 110.
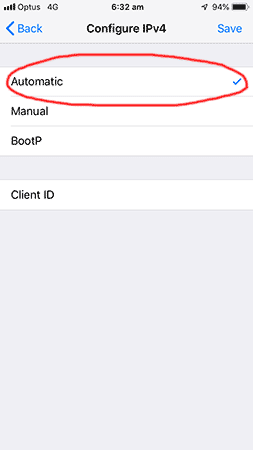
Now if you go back to settings/WiFi and your Hotspot you can change your Smartphone back to Automatic IP configuration or DHCP on Androids to return it back to the LAN's subnet.
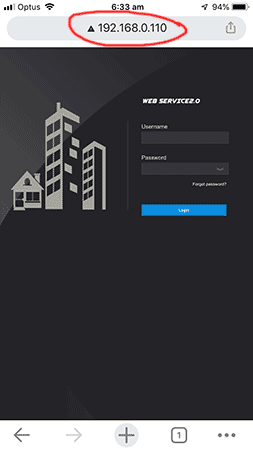
Now if you enter the new IP Address of the host into the address bar of a Web Browser you will be able to login into the Host and go to the next step.