
No-weld Gates on a Slope
Introduction
Any style of No-weld Swing or Sliding Driveway Gate can be made for driveways that slope across by angling the bottom rail (raking) to fit the slope. This requires cutting the corners at the correct angle.
Sliding gates aren't effected by slope up or down from the road only slope across the driveway.
Swing gates opening inwards aren't effected by slope down from the road by can be effected by slope up from the road ... READ MORE
Measuring the Driveway
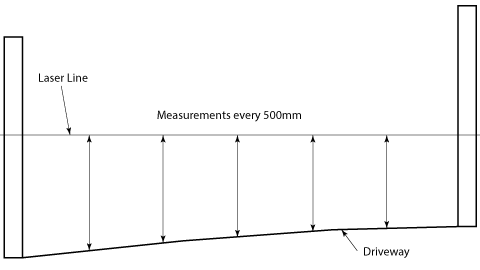
The driveway should be measured with a laser level every 500mm along the path the gate will be travelling, which is a straight line 70mm or so behind the fence for single panel sliding gates, two or more straight lines for telescopic gates the first being 70mm from the back of the fence and the others 100mm behind this or the entire area of driveway must be measure for rising swing gates where the gate will moving over. Use a CAD program to draw the shape of the driveway referenced from the laser line. You'll also need the height of the posts.
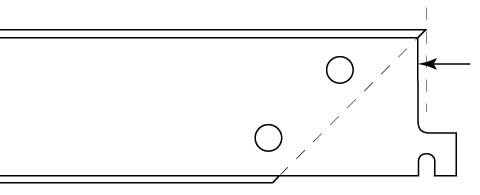
Getting the Correct Rake Angle
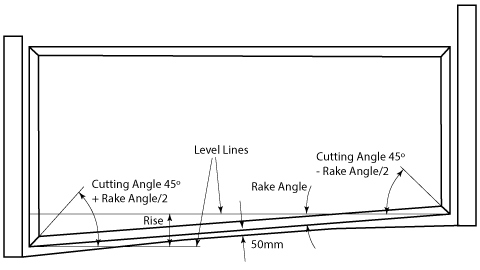
To get the correct cutting angle the gate should be drawn to scale into the drawing of the driveway to work out how it will fit. Draw level lines in 90o to the stiles form the bottom of each stile, this will give the rake angle, which is necessary for finding the cutting angle for each corner. Because mitre saws cut at 90o but considers this 0o the cutting angles for the mitre saw must be taken from the level lines that are 90o to the stiles.
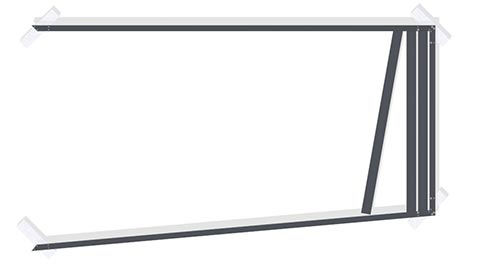
Cutting the corner brackets
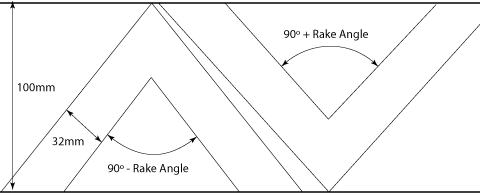
Corner brackets can be custom made for raked gates from a piece of 100mm wide x 10mm thick aluminium flat bar. Two brackets are required one with an angle 90o plus the rake angle and the other 90o minus the raked angle. These must be cut with a drop and slide mitre saw as a compound saw won't reach. Care must be taken to get the angles accurate.
Drilling Holes for a raked corner bracket
The jig normally used for drilling holes into the mitred ends of No-weld framing can also be used for raked corners although if the angle is smaller than 90o the jig should be set in a little further than normal so the tek screws don't end up being too close to each other. Once holes are drilled in the framing the corner bracket can then be inserted into the framing and aligned with the corner then have its holes marked and drilled. See Guide to Cutting/Drilling No-weld
Fitting Vertical Slats with a raked bottom
When fitting vertical slats to a gate with a raked bottom rail and a square top rail the slats must all be different lengths, which takes longer to cut and must be inserted into the shortest stile end first. If the slope is steep enough the bottom of the slats may need to be cut at an angle too.
Fitting Horizontal Slats with a raked bottom
If a raked gate has horizontal slats the bottom rail can be made from slotted No-weld framing so they can be inserted directly making it much easier to fit them in. Screws for these slats must be as close to the edges of the slat as possible to help stiffen the bottom rail.
Setting the guide rail lower then the Top
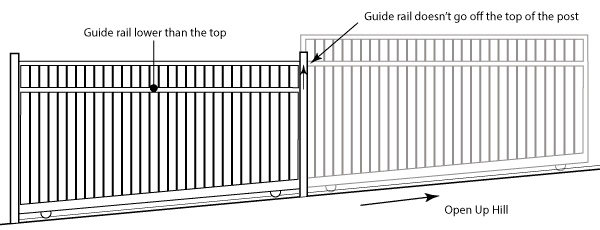
No-weld Sliding gates with a raked bottom rail and a square top that open up hill need a guide rail set down from the top so the guide post doesn't need to be higher than the fence.
Fitting guide rails to slats
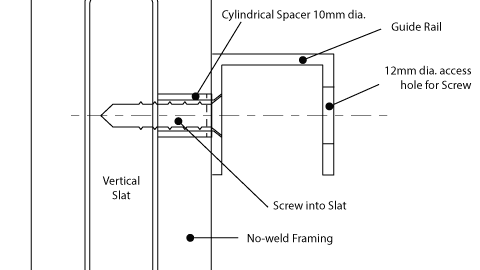
The guide rail could be fitted to a middle rail set at the correct height or could be on its own screwed to vertical slats or supports whatever works best for the gate design.