
Guide to fitting No-weld Hardware
Fitting No-weld Slat Spacers
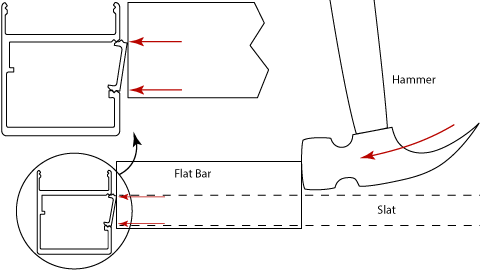
The spacers that go between slats are fitted by placing the edge of one into a small 'V' groove in the slot then holding it there with a short length of aluminium flat bar or similar material such as plywood or plastic that is no wider then the length of the spacer then hit the flat bar with a hammer to click the other edge of the spacer in place.
The length of the spacers will be pre-cut for you so that all slats fit neatly into the height of the gate. If you want to cut your own see Guide to cutting Slat Spacers.
Tips on Fitting No-weld Slat Spacers
By putting a knee in behind the frame member it holds the frame in place when fitting spacers otherwise it can move around everywhere.
It is easier to fit the spacers next to a slat before the next slat is fitted although for the last slat it is necessary to fit the spacer between the last slat and the frame so the spacer should be stuck on the end of the flat bar with a tiny amount of blue tack or something similar enough to just hold it on the flat bar so it can then be placed on the slot and tapped in place.
It is faster to have two people fitting the spacers one each side of the gate other wise one person has to move from one side to the other for every slat, which is good exercise but a lot slower.
To Removing a Slat Spacer
Use a flat headed nail punch and hammer to push the spacer into the slot. Its likely to drop down into the framing so will need to be fished out, which can normally be done with some blue tack on the end of the punch or needle nose pliers.
Fitting No-weld Slot Back Covers

One edge of the back cover should be fitted into the 'V' groove of the open back of the No-weld framing and the other sitting on top held in place by hand. Then tap the other edge gently with a rubber mallet on an angle starting from one end of the framing first to click this end in holding the cover in place well enough to check the other end fits ok. Then continue tapping along working across to the other end until the full length is clipped in place.
If you want to take the back cover off
![]()
You cannot just lever the back cover off but you can push one edge of it in and lift the other out.
Using a length of 40mm or 50mm x 6mm aluminium flat bar x about 300mm long, place it hard up against one edge of the cover at one end of the cover and hit it firmly with a hammer to push it in past the 'V' groove working your way across the length of the cover until it is sitting loose in the open back of the framing. The cover can then be lifted out from the other edge.
Attaching Hardware to the back of a No-weld Frame
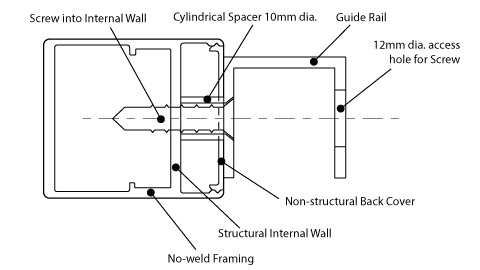
Because the back for No-weld framing clips on and can be pushed in (which is necessary to be able to remove it) you cannot just screw hardware such as hinges, stops or guide rails to the back cover. Instead you must drill a 10.5mm hole into the cover and slip in a 12mm long cylindrical spacer 10mm diameter and then screw through the spacer into the structural internal wall of the frame. This will work with any hardware fitted to the back of a No-weld frame.
Attaching Guide Rails to Slats
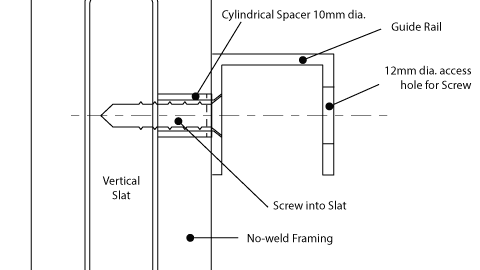
A guide rail can be fitted to a No-weld gate that has vertical slats where there is no framing rail by screwing to stiles where it can and directly to the slats using a 15mm long cylindrical spacer 10mm diameter.