
No-weld Inset Laser Cut Sheeting Gates
Introduction

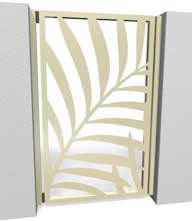
Gates with laser cut or perforated metal sheeting can have the sheeting inset into a frame made from No-weld Box Section Framing. The sheeting can be glued or riveted to aluminium angles that are riveted to the framing before it is cut making corners very neat and quick to do, giving a unique look, possible only because there are no welds in the corners to get in the way, giving a nice clean sharp corner. Swing gates can go up to 4m wide x 2m high and sliding gates 6m wide x 2m high. Gates wider than 1.5m require one or more middle stiles every 1.5m or so and gates higher than 1.5m may require a middle rail depending on the laser cut design, the sheeting fits between stiles and rails.
Sliding gates do require a sliding gate channel see No-weld sliding gates and No-weld Telescopic Sliding Gates to learn more.
No-weld frames and laser cut sheeting may have many different finishes READ MORE
What's included in a No-weld Laser Cut Sheeting Gate DIY Kit?
Kits come pre-cut and drilled ready to assemble. Sheeting may be fitted to the front of the frame, set into or suspended in the frame.
Getting a Quote
Please contact us for a free quote for a DIY gate kit or if there's an installer in your area full installation.
Things to Consider
Laser cut or perforated sheeting is mostly 3mm thick aluminium but can be steel or other materials too if desired although generally there is a size limit before the sheet becomes too springy. The size limit depends on the design cut into the sheet and the type of gate, if the sheet has larger areas cut out then it will need to be smaller or if it has smaller areas cut out it can be larger. Gates are divided up using middle stiles or in some cases middle rails with laser cut sheeting placed in between stiles and rails attached to aluminium angle set in behind the sheeting set into the frame.
Making No-weld Laser Cut Sheeting Gates yourself.
If you're in the gate or fence business and want to move into something a little more up market. then making No-weld Laser Cut Sheeting Gates could be the answer. All you need is a good mitre saw and some lengths of No-weld framing for the frames and a creative eye for designs of the laser cut sheeting.
You can order No-weld framing and hardware at the No-weld Online Shop.
Making these gate frames requires mitred cuts, for technique on how to mitre cut No-weld framing accurately and cleanly with no burrs and drill holes for corner brackets see our our Guide to Cutting and Drilling No-weld Framing. There are other styles of gates too see What can be Made with No-weld.
Trade Customers
If you become one of our trade customers we can pass work onto you for free for No-weld gates, infill panels and fencing. You can either work as a fabricator only for others to install or as a fabricator and installer. See below on how No-weld set into the frame laser cut sheet gates are assembled.
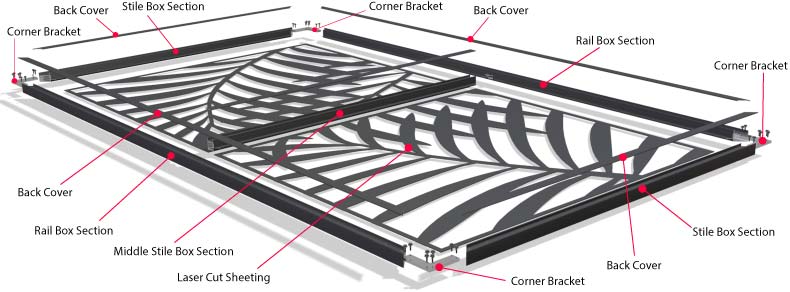
Assembly Instructions for No-weld set in the frame Laser Cut Sheeting Gates
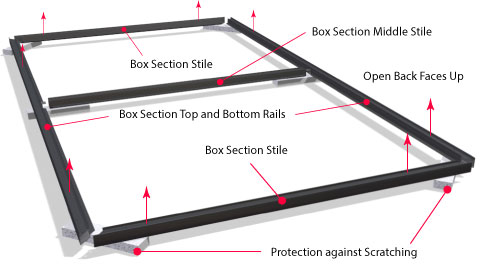
Place the pre-cut and drilled frame members, with angles pre-fitted on clean blocks of polystyrene foam or similar non-scratching material laid out on a flat surface with the open back faces up.
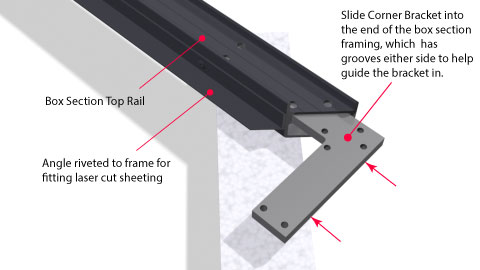
Corner brackets are required to hold the frame together. These are fitted by sliding them into the ends of the top and bottom rails to begin with, which have grooves in both sides to help guide the bracket in.
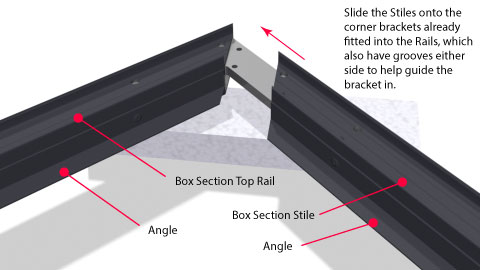
Then slide the stiles onto the corner brackets of the top rail. The stiles also have grooves either side to help guide the brackets in.
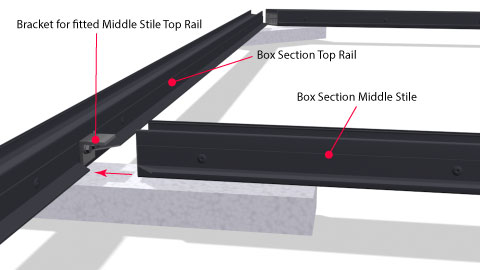
Gates wider than 1.5mm require one or more middle stiles (one every 1.5m or so) that are screwed to the frame with small angle brackets pre-fitted to the main frame. Slide the top of any middle stiles onto these brackets.
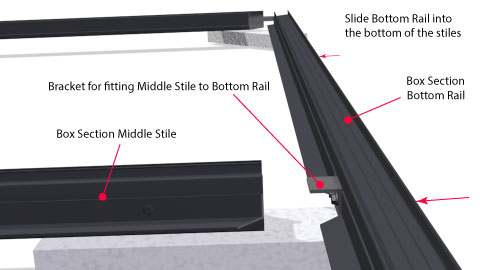
Then slide the bottom rail onto the end stiles, followed by any middle stiles.

Then fit four larger tek screws into each corner bracket using a cordless drill in the pattern illustrated to hold the frame together for now.
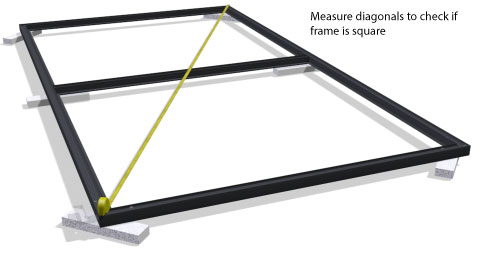
Once screwed together check the diagonals of the frame to make sure it is square, if not loosen all bracket screws, adjust the diagonals so they are the same then tighten the screws back up again. The rest of the screws can now be fitted.
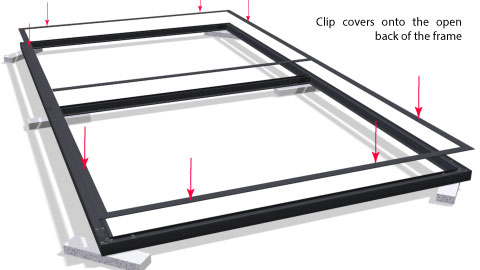
Covers are then clipped into the back of the frame and vertical supports or middle rails (if there are any) to cover the screws. See Guide to Fitting No-weld Hardware for technique on how to do this.
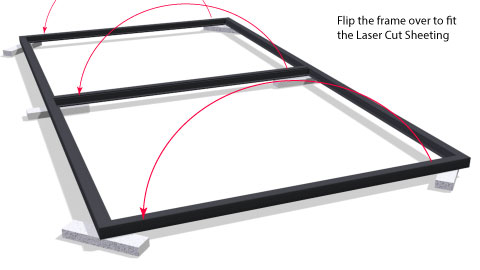
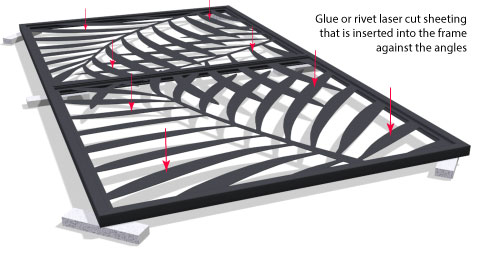
Then turn the frame over so the laser cut sheeting can be riveted or glued to the angles set into the frame. If riveted the sheeting can be fitted after the frame is installed otherwise if glued it must be done on the flat and left for the glue to set.
Now the hardware such as hinges, latch, stop or guide rail can be fitted to the back of the frame. See Guide to Fitting No-weld Hardware.